I'm overall pleased with the final outcome of the animation now that it has been put together in premier pro. With all the last minute changes and especially with the music it is much better. I think the group has done well with their animations. I am though slightly disappointed in some parts where I feel I could have done better myself. I do feel that I am happy to say I did my best, because I did, and I have put the time in. But I would like to have worked a bit further on the animation to perfect the movement of my characters. Again, I'm overall satisfied with the outcome of my work.
I have learnt new features in Max in this project such as creating a character, using bipeds, and animating characters which I had never done before. I'm pleased that I have been able to add to my knowledge of 3Ds max, but I am slightly disappointed that I didn't use the reactor tool in my scene. This would have been better for the scene and for learning. I am delighted though with the lighting, I thought that was good, and the modeling as well.
The group I feel worked well together in the project. General communication was good in the group, but I do think there was lack of communication from one member, which I think may show. But I think most of the group put the time in, getting there early and staying late most days. I think because of this, we can definitely be pleased with the animation because we have worked hard on it.
This is the Final Cut of the YMCA Animation:
Friday, 12 December 2008
Thursday, 11 December 2008
Wednesday, 10 December 2008
Making Changes to the Scene
Being honest, our presentation for the YMCA didn't go that well at all. We wernt prepared and nothing was going right on the day. But putting that aside im going to talk about my scene at that stage. Taking into account that what was shown wasn't the finished animation, the main panning shot of my scene was obviously way too slow and as a consequence was boring. Ive since gone back to the scene and moved bits around, and speeded things up.
*Ive also gone back to the scene and taken off all the question marks off my characters. The other characters in the group were made using a different method, and the question marks couldn't be put onto them. The easy option was for me to take the question marks off my characters to make the whole animation consistent.
The idea was that the question marks on the silhouettes were people we didn't know who they are, or the slogan we were going to use along the lines of 'It could be you'. Basically adding to the idea that anyones welcome, people of all types, and the fact that it could be yourself that could be one of those characters.
Ive also made changes to the final shot in the scene by speeding that up too, and tried to give it more movement in the shot. This is the final shot in the scene:
This was the video we tried to show in the presentation:-
Friday, 5 December 2008
Animating
I have managed to animate the balls being hit on the pool table, but I haven't done so with a reactor. What happend is, I spent the time moving each individual ball each time to make the reaction of the balls being hit. But after I had done it and renderd a sequence, someone then said to me about using a reactor which I had never heard of before. I decided that being pushed for time, I should continue with the rest of the scene, and then come back to it if i can. I think it would have been easier to use the reacter tool, and of what ive seen of the tool in use, I would have like to have included it in my scene.
(Although, using the reacter tool, would I had got a ball in the pocket? hmmmm...)
Tuesday, 2 December 2008
Animating
As well as never creating a character before, ive never animated one. Ive been working on moving the arms and legs to give the characters movement. Ive managed to animate a guy playing pool, a group of people playing twister, the guys watching and singing karaoke, and a guy on the sofa. Im quite please with the animation of the character playing pool.
For the camera shots of the scene, i have decided on the following:-
1) Transition from Lukes scene with a pan of the room, and following down to the pool table to see the character take a shot.
2) Cut to a closer shot from the other side of the table to see the balls get hit.
3) Cut to the far pocket to see one of the balls being potted, and have the camera follow round the table to the two characters on the sofa with the final shot.
Monday, 1 December 2008
Character Positioning > Continued
Ive put eleven characters in the room now, and positioned them where I want them to be. Ive also been animating some of the characters for a single curved panning shot of the room. I will also be including different shots of the room, but this is the first one. This is how the room looks at the moment:  (oh yea, I added twister... randomly).
 (oh yea, I added twister... randomly).
Friday, 28 November 2008
Character's > Continued
I did get stuck again with the character, but ive got past it. I spent an hour wondering why the biped and the body wouldn't stay together when I tried to move it. I found it was something so simple which was rather anoying. Anyways, ive pushed on, and ive been positioning the characters in my room. I also ditched Lisa's head, tried my own, and then ditched that too. Instead ive just used the bipeds head as it looks alright when coloured in black. This is how it looks like at the moment...


Tuesday, 25 November 2008
Creating a Character > Continued
I have decided that the easiest way to animate a character is to use a biped. The only problem was that the character didnt fit with a biped, but ive now managed to resize and modify my character to fit. I think this was the easiest option for me to take. Ive had to re-shape the shoulders and ends of the arms, as well as re-scale the torso, arms, hands... basically everything.

The body now fits with the biped, and ive linked each part of the body to the biped using the physique tool from the modifier list.

The body now fits with the biped, and ive linked each part of the body to the biped using the physique tool from the modifier list.
Wednesday, 19 November 2008
Creating a Character

This is my first attempt at a character. Ive never created a character in 3Ds Max before so it has been quite a challenge for me. Ive basically got the model done which has Lisa's head on, but im having trouble trying to bone it. Im getting quite frustrated with this, so im going to leave it and come back.

Monday, 17 November 2008
YMCA Room - Continued> Sofa
I have now made the final additions to the room which are two tweed sofa's. I think I have now come to the point where I'm happy with the room and will next need to think about animating.


The sofa was created by using the chamferBox tool in the extended primitives. Ive never got around to using this tool before so it was a new tool for me. For the sofa I created a large chamferBox and a smaller one, which I boolean away from the large one. I then created a few more chamferBox's for the cushions which I arranged and rotated. Last of all a tweed material was applied to finish off the sofa.

Ive also created a microphone for the karoke to go with the speakers.


The sofa was created by using the chamferBox tool in the extended primitives. Ive never got around to using this tool before so it was a new tool for me. For the sofa I created a large chamferBox and a smaller one, which I boolean away from the large one. I then created a few more chamferBox's for the cushions which I arranged and rotated. Last of all a tweed material was applied to finish off the sofa.

Ive also created a microphone for the karoke to go with the speakers.
Friday, 14 November 2008
YMCA Room - Continued> PacMan
Tuesday, 11 November 2008
YMCA - Creating a Room
Tuesday, 4 November 2008
Friday, 31 October 2008
Virtual Face - Summery

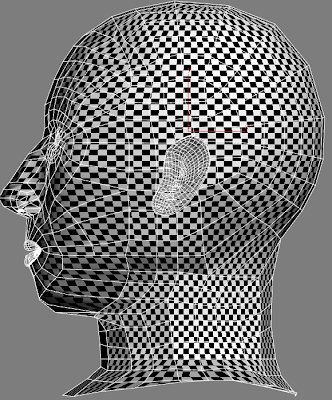
Ive now finished my virtual face, although not completed. I would like to have completed the face with the mapping to see what it would have looked like. Although I was unable to achieve this I am still pleased with the progress I made, and the final outcome.
At the beginning of the project I thought the virtual face would be challenging and at the time seemed very daunting. The project proved to be challenging, but came with a huge beneficial learning curve. Whilst I am pleased with what I have achieved, I think that if I was to do the project again, I would be able to produce a better virtual face.
Thursday, 30 October 2008
Virtual Face - UVW Mapping
Tuesday, 28 October 2008
Virtual Face - Week 6
This week ive progressed a lot further. Since last week where I got stuck, ive managed to complete the side of the head, and continue it to complete a full neck and part of the shoulders.
This is how it progressed:-
1)
2)
3)


I was really happy with the outcome of my head, right up until the point I renderd it. It turns out there are parts of the face that have slight gaps after it has been smoothed, and the face somehow looks better without it. It doesnt look as good as i was hoping. The reason for these gaps may be to do with verticies and lines which might not be attatched properly, but they can only be seen when smoothed and rendered. Ive gone back over and over again, deleting parts and re-doing them to solve the problem, but the results are the same, and im just getting more anoyed with it. Im going to have another go at it this week to see if i can fix it.
The last things that need to be done to the head are the ears and the UVW mapping.
This is how it progressed:-
1)

2)

3)


I was really happy with the outcome of my head, right up until the point I renderd it. It turns out there are parts of the face that have slight gaps after it has been smoothed, and the face somehow looks better without it. It doesnt look as good as i was hoping. The reason for these gaps may be to do with verticies and lines which might not be attatched properly, but they can only be seen when smoothed and rendered. Ive gone back over and over again, deleting parts and re-doing them to solve the problem, but the results are the same, and im just getting more anoyed with it. Im going to have another go at it this week to see if i can fix it.
The last things that need to be done to the head are the ears and the UVW mapping.
Wednesday, 22 October 2008
Virtual Face - Week 5
This week I managed to finish pulling all the points out on my face to give it a 3D shape. It was a very time consuming process with a lot of tweaking involved to get it as accurate as possible. I was really please with myself once I had finished this stage.

I was also able to mirror the other side of the face and make further tweaks. I was really impressed when the the whole of the face was completed.

The next stage I decided to do was creating the rest of the head. This was done by creating a sphere behind the face, scaling and shaping the sphere until it looked about right.

Once the sphere was about the right size and shape for the head, I had to delete sections off the side and drag sections at the back of the head down to make the top of the neck. Once this was done I attached the head to the face.


After this stage I hit a bit of a road block trying to get the side of the head done. I decided to leave it for a bit, but ill have to sort it out next time I work on it. Once ive got the side of the head done, ill be able to concentrate on trying to create the lips and ears.

I was also able to mirror the other side of the face and make further tweaks. I was really impressed when the the whole of the face was completed.

The next stage I decided to do was creating the rest of the head. This was done by creating a sphere behind the face, scaling and shaping the sphere until it looked about right.

Once the sphere was about the right size and shape for the head, I had to delete sections off the side and drag sections at the back of the head down to make the top of the neck. Once this was done I attached the head to the face.


After this stage I hit a bit of a road block trying to get the side of the head done. I decided to leave it for a bit, but ill have to sort it out next time I work on it. Once ive got the side of the head done, ill be able to concentrate on trying to create the lips and ears.
Wednesday, 15 October 2008
Virtual Face - Week 4
This week ive been trying to turn my 2D poly of the front view of my face into 3D. This requires pulling out points on the face and judging how far to pull them out in relation to the side view picture. I found this difficult and very time consuming. I'm half way through with it so it looks a bit weird at the moment, but hopefully when all the points are moved to where I want them it should be alright. I'm sure there will be a lot of tweaking at this stage to get it right, but im looking forward to see how it turns out.

Virtual Face - Week 3
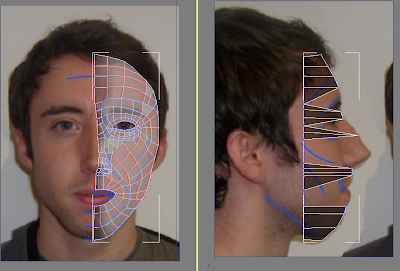
This week I spent my time using 3Ds Max putting my front and side view pictures (with topology lines) onto two separate planes. I then made a start of tracing the topology lines on the front picture with the magnetic line tool. Along the way i've made slight changes to some of the topology lines where I thought they weren't quite right or needed slightly adjusting.
This was the result after tracing the topology lines.

This was the result after tracing the topology lines.

Virtual Face - Week 2
The progress on my virtual face is going well. The front and side view pictures of my face have been alligned the best i could and ive now finished putting the lines onto both views. I found illustrater much eaiser to put the topology lines. It allowed me to add and move lines which were much smoother.


Virtual Face - Week 1
Tuesday, 7 October 2008
The Final Idea
The final idea for our animation is to create a walk through of all the different services and ages of people who attend the YMCA.
For example, we will start with a young child at nursary playing, getting up and walking out the room. As the child moves into the next room, they will transition into an older child of a primary school age. The same will happen again, perhaps with a different transition which could have the child walking behind a book stand. The next stage will be the child transforming again into an older age child at one of their music nights. The last stage will be the child leaving the YMCA in a happy mood, and perhaps with a group of friends.
Brainstorm of Idea

Story Board will follow...
For example, we will start with a young child at nursary playing, getting up and walking out the room. As the child moves into the next room, they will transition into an older child of a primary school age. The same will happen again, perhaps with a different transition which could have the child walking behind a book stand. The next stage will be the child transforming again into an older age child at one of their music nights. The last stage will be the child leaving the YMCA in a happy mood, and perhaps with a group of friends.
Brainstorm of Idea

Story Board will follow...
YMCA Visit
The visit to the YMCA gave us an insite into how the YMCA works and what they do.
The YMCA caters for children up to the age of 18. They range from a nursery for the younger children, to live music for the older aged kids.
Thursday Night - Rock school 7:30pm -9:30pm. There are 7 bands that perform with 20, 30, 40 people attending.
Friday Night - Live band (once a month), drum and bass night, mc night, with 30- 200 people attending.
Every year there is a 3 day festival with bands and a showcase in Central park. The festival is called the "Y Festival".
They also provide breakfast and after school class for infants and primary school children.
The YMCA contacts and advertises through MySpace, Facebook, email and word of mouth. Sometimes they visit primary schools to promote the services of the YMCA. The YMCA is also associated with the primary care trust.
The aim is to promote the YMCA in a way that says they are open to whoever wants to go, and not seem like specific groups attend the YMCA.

Monday, 22 September 2008
1st Lesson
Virtual Faces:
For this project pictures of our own faces will be used to create a 3D version of our own heads. This will be done using Photoshop to correct the photo's and then 3Ds Max to create the 3D head.
YMCA:
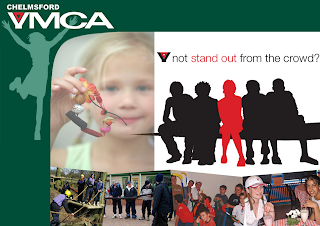
This project involves producing an animation that promotes some of the services that the YMCA in Chelmsford has to offer. We will be working for Craig Gough who is the man running the YMCA in Chelmsford. This project will also be worked on in groups.
First Thoughts
My first thoughts of the character face project are that it looks like a challenging project. It seems a difficult task to model our faces into 3D, but im looking forward to taking on this project and learning how it can be done. This should a big learning curve into my knowledge of 3Ds Max.
I am also looking forward to the YMCA project to see what we can gain from practical work, not only working in a group, but also from working with a client.
Subscribe to:
Comments (Atom)


